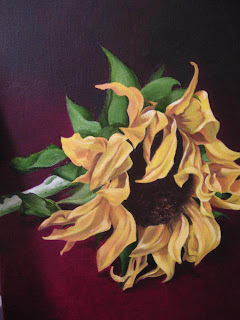
So...Our first color layer.
After the last step, we were left with what looked like a moonlit picture of a sunflower. If the background had not already been red (yes, yes, I know...deal with it) the effect would have been lovely on its own, but now we get to the fun part and that's...adding color.
Because we did the hard part several steps ago and established the values of our subject and then honed those value judgments in the dead layer, all we really have to do now is color it in like a coloring book.
Here's another example where I dont want you (and you know who you are) to try to reinvent anything at this point.
Look at the subject. Look at each petal. while there are varying VALUES of yellow...are there really different COLORS of yellow. In this case, because our flower was dying, there were subtle color changes, but in the case of the leaves for example...they were just...green. Light and darker green, true, but all the same COLOR of green. So...while avoiding Veridian like the H1N1 virus, mix a nice green. (Sap Green is always a good bet...nice and transparent to boot). Now...pick a leaf (or whatever subject you're working on) and simply 'color it in'. Yep, just paint right over the whole leaf with the ONE shade of green that you've mixed.
Low and Behold...Lord a'mighty...look at all of the values of green that show up. That's because we're applying a thin glaze over our established value layer thereby creating a tonal shading of the green leaf. Now, if the leaf had some yellow areas, or in this case, some brownish dead spots, those will have to be addressed later.
What we dont want to do and what you shouldnt have to do if you've followed directions up to this point is mix 'lighter or darker...color".
In this example...all leaves were painted with Sap Green right out of the tube. (very little liquin even). The petals had a little bit of variety in the yellow, varying from cadmium yellow to the Oh so delicious 'Indian Yellow" which is simply Sunshine in a Tube. What I didnt have to do is vary the shades or tints of these yellows. Straight on the canvas because, again...the value work is already done.
If you wanted really light spots, the underlying dead layer should have been white. Get it? There is rarely a need to add any white to a color at this point. later, we'll add some white for details,but not at this point.
In fact, adding white to any of our colors at this point will ruin the effect. That's not overdramatic, it's simply a fact. Adding white to any paint makes it opaque (non transparent) which means we c'aint see through it...and if we can't see through it, then all previous layers are/were a complete waste of time.
One thing that I hear again and again from my students at this stage and in about 3 more steps is "Y'know...you were right. I wish I'd listened to you...NEXT TIME..." So...save yourself the time and frustration and do it right the first time.
Enjoy the first color.
Next...MORE COLOR. Woohoo!
No comments:
Post a Comment