Howdy.
In step four of our sunflower demo, we'll do what is known as the Dead layer, or Grisaille layer. Basically, this layer creates a layer of exact values similar to the previous umber layer, but with more emphasis on the important parts of our painting.

You can do the entire picture in the dead layer, but I think emphasizing certain elements gives the finished work more punch and pizazz.
I've applied another glaze layer to the background deepening the red/violets and plum colors. Still using Purple Madder, Transparent violet and French Ultramarine.
To create the moonlit effect of the dead layer we need a neutral grey. Now... may have gotten a sense about how I feel about black -out of the tube. So...'nuff said 'bout that. Mix a neutral black. I like to use Raw Umber and Ultramarine. Maybe the slightest bit more umber than blue. When you mix them, spread a bit out on your palette and you'll see when you've reached a deep luscious black. That's what we want. Try mixing a tiny bit with white. You should wind up with a very neutral gray. If you're not sure, get a value scale from any art store, or even compare the gray to something that you know is neutral.
So, when you've made this lovely black and ensured that your grey is neutral and NOT blue (which many people err on the side of) you're ready to go.
Note: your lighting has a lot to do with it. You may find that if you work in different lights that your greys will look different. Try to work in natural light or with a full spectrum light bulb.
Now that you've got your black and subsequent grey, you can paint your dead layer. You do this by strictly following the values you established in the umber layer. Remember in step one when I said every step is built on the one before. You're brown values followed your drawing and now your dead layer will follow your umber layer. Do NOT reinvent the wheel here. If you think you've made an error in the drawing, live with it. No one is going to have the original item or photo when they view your painting to say "hey dude, this petal isnt as full as it should be'. Trust your underlying layer.
Using your created black and varying amounts of white (I use Titanium white. ) follow the values laid down previously and basically, very carefully and purposefully, paint your subject as though the finished work will be monochromatic. Keeping in mind the surface of the thing you are painting. In this case, following the flower petals the way they naturally grow.
If you tend to paint more impressionistically day to day, be extra careful to hide brush strokes. We arent going for painterly here. We're going for glowing glorious realism. Not to say anything is wrong with painterly and free impressionism, but that's not the point of THIS painting. so...hide those brushstrokes. It might even do you well to have a nice soft clean brush on hand to smooth out any rough bits. (be sure to clean or wipe off this brush regularly).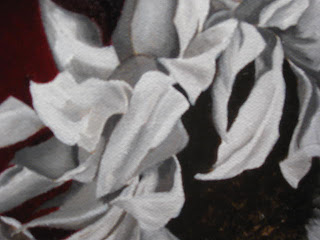

When you are finished, as you can see in this closeup, you'll have a monochromatic very detailed painting with the grey emphasis on your main subject, in this case, the sunflower.
Next step is where the fun comes in. The color glazing.
No comments:
Post a Comment